| ❌ | ❌ | ❌ | ✅ | ✅ | ❌ |
|---|
Prime Hub / Inventor Hub

- class InventorHub
This class is the same as the
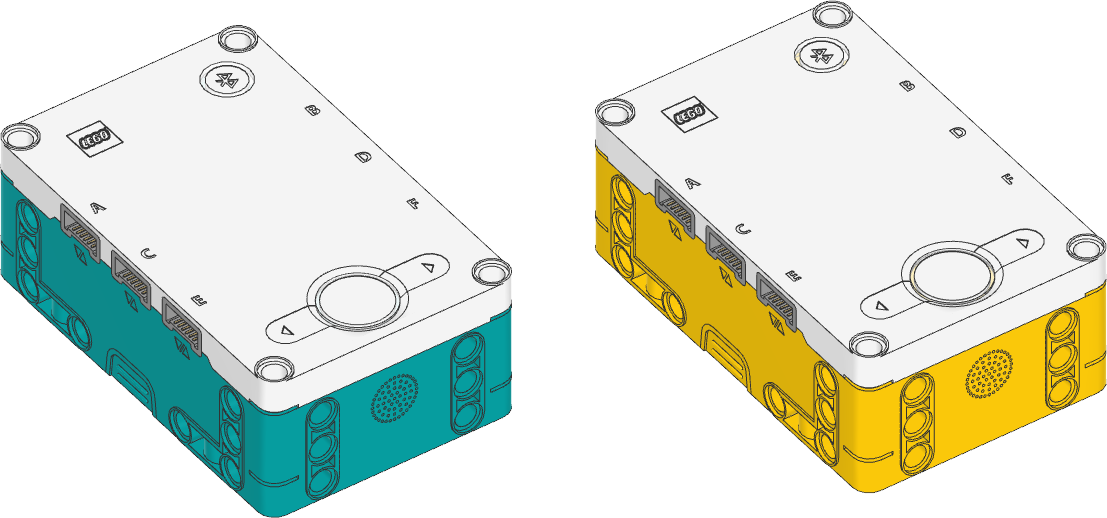
PrimeHubclass, shown below. Both classes work on both hubs.These hubs are completely identical. They use the same Pybricks firmware.
- class PrimeHub(top_side=Axis.Z, front_side=Axis.X)
LEGO® SPIKE Prime Hub.
Initializes the hub. Optionally, specify how the hub is placed in your design by saying in which direction the top side (with the buttons) and front side (with the USB port) are pointing.
- Parameters
Using the hub status light

- light.on(color)
Turns on the light at the specified color.
- Parameters
color (Color) – Color of the light.
- light.off()
Turns off the light.
- light.blink(color, durations)
Blinks the light at a given color by turning it on and off for given durations.
The light keeps blinking indefinitely while the rest of your program keeps running.
This method provides a simple way to make basic but useful patterns. For more generic and multi-color patterns, use
animate()instead.
- light.animate(colors, interval)
Animates the light with a sequence of colors, shown one by one for the given interval.
The animation runs in the background while the rest of your program keeps running. When the animation completes, it repeats.
Using the light matrix display

- display.orientation(up)
Sets the orientation of the light matrix display.
Only new displayed images and pixels are affected. The existing display contents remain unchanged.
- Parameters
top (Side) – Which side of the light matrix display is “up” in your design. Choose
Side.TOP,Side.LEFT,Side.RIGHT, orSide.BOTTOM.
- display.off()
Turns off all the pixels.
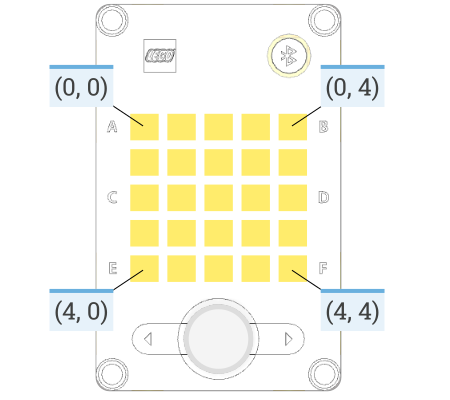
- display.pixel(row, column, brightness=100)
Turns on one pixel at the specified brightness.
- Parameters
row (Number) – Vertical grid index, starting at 0 from the top.
column (Number) – Horizontal grid index, starting at 0 from the left.
brightness (Number brightness: %) – Brightness of the pixel.
- display.icon(icon)
Displays an icon, represented by a matrix of brightness: % values.
- Parameters
icon (Matrix) – Matrix of intensities (brightness: %). A 2D list is also accepted.
- display.animate(matrices, interval)
Displays an animation made using a list of images.
Each image has the same format as above. Each image is shown for the given interval. The animation repeats forever while the rest of your program keeps running.
- display.number(number)
Displays a number in the range -99 to 99.
A minus sign (
-) is shown as a faint dot in the center of the display. Numbers greater than 99 are shown as>. Numbers less than -99 are shown as<.- Parameters
number (int) – The number to be displayed.
- display.char(char)
Displays a character or symbol on the light grid. This may be any letter (
a–z), capital letter (A–Z) or one of the following symbols:!"#$%&'()*+,-./:;<=>?@[\]^_`{|}.- Parameters
character (str) – The character or symbol to be displayed.
- display.text(text, on=500, off=50)
Displays a text string, one character at a time, with a pause between each character. After the last character is shown, all lights turn off.
Using the buttons

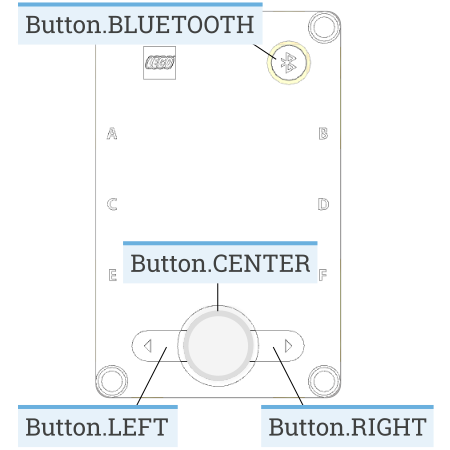
- buttons.pressed() Collection[Button]
Checks which buttons are currently pressed.
- Returns
Set of pressed buttons.
Using the IMU
- imu.up() Side
Checks which side of the hub currently faces upward.
- Returns
Side.TOP,Side.BOTTOM,Side.LEFT,Side.RIGHT,Side.FRONTorSide.BACK.
- imu.tilt() Tuple[int, int]
Gets the pitch and roll angles. This is relative to the user-specified neutral orientation.
The order of rotation is pitch-then-roll. This is equivalent to a positive rotation along the robot y-axis and then a positive rotation along the x-axis.
- Returns
Tuple of pitch and roll angles.
- imu.acceleration(axis) float: mm/s²
- imu.acceleration() vector: mm/s²
Gets the acceleration of the device along a given axis in the robot reference frame.
- Parameters
axis (Axis) – Axis along which the acceleration should be measured.
- Returns
Acceleration along the specified axis. If you specify no axis, this returns a vector of accelerations along all axes.
- imu.angular_velocity(axis) float: deg/s
- imu.angular_velocity() vector: deg/s
Gets the angular velocity of the device along a given axis in the robot reference frame.
- Parameters
axis (Axis) – Axis along which the angular velocity should be measured.
- Returns
Angular velocity along the specified axis. If you specify no axis, this returns a vector of accelerations along all axes.
- imu.heading() float: deg
Gets the heading angle relative to the starting orientation. It is a positive rotation around the z-axis in the robot frame, prior to applying any tilt rotation.
For a vehicle viewed from the top, this means that a positive heading value corresponds to a counterclockwise rotation.
Note
This method is not yet implemented.
- Returns
Heading angle relative to starting orientation.
- imu.reset_heading(angle)
Resets the accumulated heading angle of the robot.
Note
This method is not yet implemented.
- Parameters
angle (Number, deg) – Value to which the heading should be reset.
Using the speaker
- speaker.volume(volume)
- speaker.volume() int: %
Gets or sets the speaker volume.
If no volume is given, this method returns the current volume.
- Parameters
volume (Number, %) – Volume of the speaker in the 0-100 range.
- speaker.beep(frequency=500, duration=100)
Play a beep/tone.
- speaker.play_notes(notes, tempo=120)
Plays a sequence of musical notes. For example:
["C4/4", "C4/4", "G4/4", "G4/4"].Each note is a string with the following format:
The first character is the name of the note,
AtoGorRfor a rest.Note names can also include an accidental
#(sharp) orb(flat).B#/CbandE#/Fbare not allowed.The note name is followed by the octave number
2to8. For exampleC4is middle C. The octave changes to the next number at the note C, for example,B3is the note below middle C (C4).The octave is followed by
/and a number that indicates the size of the note. For example/4is a quarter note,/8is an eighth note and so on.This can optionally followed by a
.to make a dotted note. Dotted notes are 1-1/2 times as long as notes without a dot.The note can optionally end with a
_which is a tie or a slur. This causes there to be no pause between this note and the next note.
- Parameters
notes (iter) – A sequence of notes to be played.
tempo (int) – Beats per minute. A quarter note is one beat.
Using the battery
- battery.voltage() int: mV
Gets the voltage of the battery.
- Returns
Battery voltage.
- battery.current() int: mA
Gets the current supplied by the battery.
- Returns
Battery current.
Getting the charger status
- charger.connected() bool
Checks whether a charger is connected via USB.
- Returns
Trueif a charger is connected,Falseif not.
- charger.current() int: mA
Gets the charging current.
- Returns
Charging current.
- charger.status() int
Gets the status of the battery charger, represented by one of the following values. This corresponds to the battery light indicator right next to the USB port.
Not charging (light is off).
Charging (light is red).
Charging is complete (light is green).
There is a problem with the charger (light is yellow).
- Returns
Status value.
System control
- system.set_stop_button(button)
Sets the button or button combination that stops a running script.
Normally, the center button is used to stop a running script. You can change or disable this behavior in order to use the button for other purposes.
- Parameters
button (Button) – A button such as
Button.CENTER, or a tuple of multiple buttons. ChooseNoneto disable the stop button altogether.
- system.name() str
Gets the hub name. This is the name you see when connecting via Bluetooth.
- Returns
The hub name.
- system.storage(self, offset, write=)
- system.storage(self, offset, read=) bytes
Reads or writes binary data to persistent storage.
This lets you store data that can be used the next time you run the program.
The data will be saved to flash memory when you turn the hub off normally. It will not be saved if the batteries are removed while the hub is still running.
Once saved, the data will remain available even after you remove the batteries.
- Parameters
- Returns
The bytes read if reading, otherwise
None.- Raises
ValueError – If you try to read or write data outside of the allowed range.
You can store up to 512 bytes of data on this hub.
- system.shutdown()
Stops your program and shuts the hub down.
- system.reset_reason() int
Finds out how and why the hub (re)booted. This can be useful to diagnose some problems.
- Returns
0if the hub was previously powered off normally.1if the hub rebooted automatically, like after a firmware update.2if the hub previously crashed due to a watchdog timeout, which indicates a firmware issue.
Note
The examples below use the PrimeHub class. The examples work fine
on both hubs because they are the identical. If you prefer, you can
change this to InventorHub.
Status light examples
Turning the light on and off
from pybricks.hubs import PrimeHub
from pybricks.parameters import Color
from pybricks.tools import wait

# Initialize the hub.
hub = PrimeHub()

# Turn the light on and off 5 times.
for i in range(5):

    hub.light.on(Color.RED)
    wait(1000)

    hub.light.off()
    wait(500)
Changing brightness and using custom colors
from pybricks.hubs import PrimeHub
from pybricks.parameters import Color
from pybricks.tools import wait

# Initialize the hub.
hub = PrimeHub()

# Show the color at 30% brightness.
hub.light.on(Color.RED * 0.3)

wait(2000)

# Use your own custom color.
hub.light.on(Color(h=30, s=100, v=50))

wait(2000)

# Go through all the colors.
for hue in range(360):
    hub.light.on(Color(hue))
    wait(10)
Making the light blink
from pybricks.hubs import PrimeHub
from pybricks.parameters import Color
from pybricks.tools import wait

# Initialize the hub
hub = PrimeHub()

# Keep blinking red on and off.
hub.light.blink(Color.RED, [500, 500])

wait(10000)

# Keep blinking green slowly and then quickly.
hub.light.blink(Color.GREEN, [500, 500, 50, 900])

wait(10000)
Creating light animations
from pybricks.hubs import PrimeHub
from pybricks.parameters import Color
from pybricks.tools import wait
from umath import sin, pi

# Initialize the hub.
hub = PrimeHub()

# Make an animation with multiple colors.
hub.light.animate([Color.RED, Color.GREEN, Color.NONE], interval=500)

wait(10000)

# Make the color RED grow faint and bright using a sine pattern.
hub.light.animate([Color.RED * (0.5 * sin(i / 15 * pi) + 0.5) for i in range(30)], 40)

wait(10000)

# Cycle through a rainbow of colors.
hub.light.animate([Color(h=i * 8) for i in range(45)], interval=40)

wait(10000)
Matrix display examples
Displaying images
from pybricks.hubs import PrimeHub
from pybricks.tools import wait
from pybricks.parameters import Icon

# Initialize the hub.
hub = PrimeHub()

# Display a big arrow pointing up.
hub.display.icon(Icon.UP)

# Wait so we can see what is displayed.
wait(2000)

# Display a heart at half brightness.
hub.display.icon(Icon.HEART / 2)

# Wait so we can see what is displayed.
wait(2000)
Displaying numbers
from pybricks.hubs import PrimeHub
from pybricks.tools import wait

# Initialize the hub.
hub = PrimeHub()

# Count from 0 to 99.
for i in range(100):
    hub.display.number(i)
    wait(200)
Displaying text
from pybricks.hubs import PrimeHub
from pybricks.tools import wait

# Initialize the hub.
hub = PrimeHub()

# Display the letter A for two seconds.
hub.display.char("A")
wait(2000)

# Display text, one letter at a time.
hub.display.text("Hello, world!")
Displaying individual pixels
from pybricks.hubs import PrimeHub
from pybricks.tools import wait

# Initialize the hub.
hub = PrimeHub()

# Turn on the pixel at row 1, column 2.
hub.display.pixel(1, 2)
wait(2000)

# Turn on the pixel at row 2, column 4, at 50% brightness.
hub.display.pixel(2, 4, 50)
wait(2000)

# Turn off the pixel at row 1, column 2.
hub.display.pixel(1, 2, 0)
wait(2000)
Changing the display orientation
from pybricks.hubs import PrimeHub
from pybricks.tools import wait
from pybricks.parameters import Side

# Initialize the hub.
hub = PrimeHub()

# Rotate the display. Now right is up.
hub.display.orientation(up=Side.RIGHT)

# Display a number. This will be shown sideways.
hub.display.number(23)

# Wait so we can see what is displayed.
wait(10000)
from pybricks.hubs import PrimeHub
from pybricks.parameters import Icon
from pybricks.tools import wait

# Initialize the hub.
hub = PrimeHub()

while True:

    # Check which side of the hub is up.
    up_side = hub.imu.up()

    # Use this side to set the display orientation.
    hub.display.orientation(up_side)

    # Display something, like an arrow.
    hub.display.icon(Icon.UP)

    wait(10)
Making your own images
from pybricks.hubs import PrimeHub
from pybricks.tools import wait
from pybricks.geometry import Matrix

# Initialize the hub.
hub = PrimeHub()

# Make a square that is bright on the outside and faint in the middle.
SQUARE = Matrix(
    [
        [100, 100, 100, 100, 100],
        [100, 50, 50, 50, 100],
        [100, 50, 0, 50, 100],
        [100, 50, 50, 50, 100],
        [100, 100, 100, 100, 100],
    ]
)

# Display the square.
hub.display.icon(SQUARE)
wait(3000)

# Make an image using a Python list comprehension. In this image, the
# brightness of each pixel is the sum of the row and column index. So the
# light is faint in the top left and bright in the bottom right.
GRADIENT = Matrix([[(r + c) for c in range(5)] for r in range(5)]) * 12.5

# Display the generated gradient.
hub.display.icon(GRADIENT)
wait(3000)
Combining icons to make expressions
from pybricks.hubs import PrimeHub
from pybricks.parameters import Icon, Side
from pybricks.tools import wait

from urandom import randint

# Initialize the hub.
hub = PrimeHub()
hub.display.orientation(up=Side.RIGHT)

while True:

    # Start with random left brow: up or down.
    if randint(0, 100) < 70:
        brows = Icon.EYE_LEFT_BROW * 0.5
    else:
        brows = Icon.EYE_LEFT_BROW_UP * 0.5

    # Add random right brow: up or down.
    if randint(0, 100) < 70:
        brows += Icon.EYE_RIGHT_BROW * 0.5
    else:
        brows += Icon.EYE_RIGHT_BROW_UP * 0.5

    for i in range(3):
        # Display eyes open plus the random brows.
        hub.display.icon(Icon.EYE_LEFT + Icon.EYE_RIGHT + brows)
        wait(2000)

        # Display eyes blinked plus the random brows.
        hub.display.icon(Icon.EYE_LEFT_BLINK * 0.7 + Icon.EYE_RIGHT_BLINK * 0.7 + brows)
        wait(200)
Displaying animations
from pybricks.hubs import PrimeHub
from pybricks.parameters import Icon
from pybricks.tools import wait

# Initialize the hub.
hub = PrimeHub()

# Turn the hub light off (optional).
hub.light.off()

# Create a list of intensities from 0 to 100 and back.
brightness = list(range(0, 100, 4)) + list(range(100, 0, -4))

# Create an animation of the heart icon with changing brightness.
hub.display.animate([Icon.HEART * i / 100 for i in brightness], 30)

# The animation repeats in the background. Here we just wait.
while True:
    wait(100)
IMU examples
Testing which way is up
from pybricks.hubs import PrimeHub
from pybricks.parameters import Color, Side
from pybricks.tools import wait

# Initialize the hub.
hub = PrimeHub()

# Define colors for each side in a dictionary.
SIDE_COLORS = {
    Side.TOP: Color.RED,
    Side.BOTTOM: Color.BLUE,
    Side.LEFT: Color.GREEN,
    Side.RIGHT: Color.YELLOW,
    Side.FRONT: Color.MAGENTA,
    Side.BACK: Color.BLACK,
}

# Keep updating the color based on detected up side.
while True:

    # Check which side of the hub is up.
    up_side = hub.imu.up()

    # Change the color based on the side.
    hub.light.on(SIDE_COLORS[up_side])

    # Also print the result.
    print(up_side)
    wait(50)
Reading the tilt value
from pybricks.hubs import PrimeHub
from pybricks.tools import wait

# Initialize the hub.
hub = PrimeHub()

while True:
    # Read the tilt values.
    pitch, roll = hub.imu.tilt()

    # Print the result.
    print(pitch, roll)
    wait(200)
Using a custom hub orientation
from pybricks.hubs import PrimeHub
from pybricks.tools import wait
from pybricks.geometry import Axis

# Initialize the hub. In this case, specify that the hub is mounted with the
# top side facing forward and the front side facing to the right.
# For example, this is how the hub is mounted in BLAST in the 51515 set.
hub = PrimeHub(top_side=Axis.X, front_side=-Axis.Y)

while True:
    # Read the tilt values. Now, the values are 0 when BLAST stands upright.
    # Leaning forward gives positive pitch. Leaning right gives positive roll.
    pitch, roll = hub.imu.tilt()

    # Print the result.
    print(pitch, roll)
    wait(200)
Reading acceleration and angular velocity vectors
from pybricks.hubs import PrimeHub
from pybricks.tools import wait

# Initialize the hub.
hub = PrimeHub()

# Get the acceleration vector in g's.
print(hub.imu.acceleration() / 9810)

# Get the angular velocity vector.
print(hub.imu.angular_velocity())

# Wait so we can see what we printed
wait(5000)
Reading acceleration and angular velocity on one axis
from pybricks.hubs import PrimeHub
from pybricks.tools import wait
from pybricks.geometry import Axis

# Initialize the hub.
hub = PrimeHub()

# Get the acceleration or angular_velocity along a single axis.
# If you need only one value, this is more memory efficient.
while True:

    # Read the forward acceleration.
    forward_acceleration = hub.imu.acceleration(Axis.X)

    # Read the yaw rate.
    yaw_rate = hub.imu.angular_velocity(Axis.Z)

    # Print the yaw rate.
    print(yaw_rate)
    wait(100)
System examples
Turning the hub off
from pybricks.hubs import PrimeHub
from pybricks.tools import wait

# Initialize the hub.
hub = PrimeHub()

# Say goodbye and give some time to send it.
print("Goodbye!")
wait(100)

# Shut the hub down.
hub.system.shutdown()