EV3 Quick Start
Installation
This page guides you through the steps to collect and install everything you need to start programming.
What do you need?
To get started, you’ll need:
A Windows 10 or Mac OS computer
Internet access and administrator access
This is required during the installation only. You will not need special access to write and run programs later on.
A microSD card
You’ll need a card with a minimum capacity of 4GB and a maximum capacity of 32GB. This type of microSD card is also known as microSDHC. We recommend cards with Application Performance Class A1.
A microSD card slot or card reader in your computer
If your computer does not have a (micro)SD card slot, you can use an external USB (micro)SD card reader.
A mini-USB cable, like the one included with your EV3 set
The typical configuration of this equipment is summarized in Figure 1.
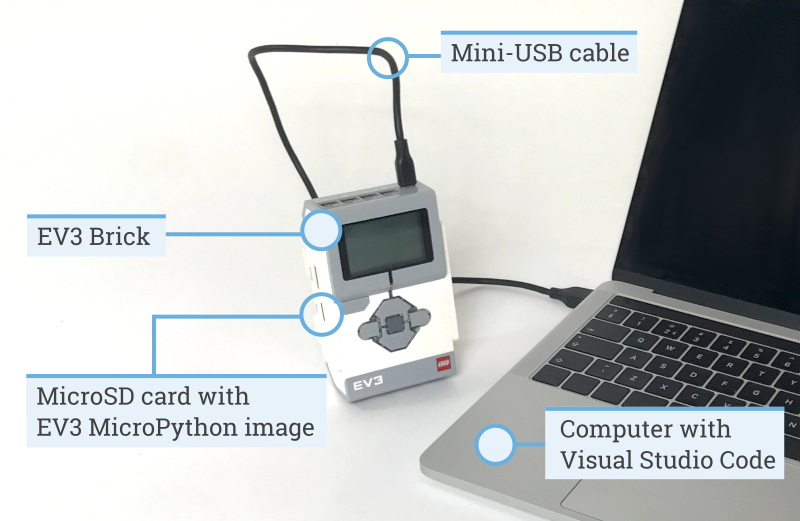
Figure 1 Setup overview
Preparing your computer
You’ll write your MicroPython programs using Visual Studio Code. Follow the steps below to download, install, and configure this application:
- Download Visual Studio Code.
- Follow the on-screen instructions to install the application.
- Launch Visual Studio Code.
- Open the extensions tab.
- Install the EV3 MicroPython extension as shown in Figure 2.
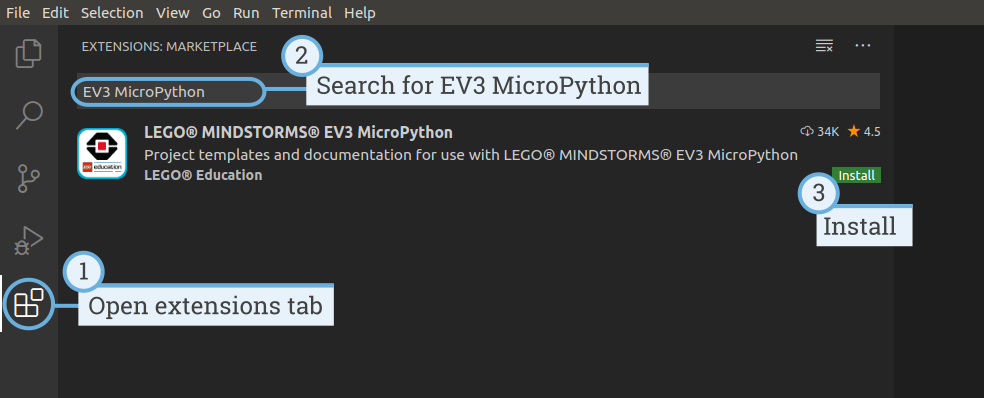
Figure 2 Installing the extension from the Visual Studio Code marketplace
Preparing the microSD card
To make it possible to run MicroPython programs on your EV3 Brick, you’ll now learn how to install the required tools on your microSD card.
If the microSD card contains files you want to keep, make sure to create a backup of its contents first. See managing files on the EV3 to learn how to backup your previous MicroPython programs if necessary.
This process erases everything on your microSD card, including any previous MicroPython programs on it.
To install the MicroPython tools on your microSD card:
1. Download the EV3 MicroPython microSD card image and save it in a convenient location. This file is approximately 360 MB. You do not need to unzip the file.
Download and install a microSD card flashing tool such as Etcher.
Insert the microSD card into your computer or card reader.
Launch the flashing tool and follow the steps on your screen to install the file you have just downloaded. If you use Etcher, you can follow the instructions below, as shown in Figure 3.
- Select the EV3 MicroPython microSD card image file you have just downloaded.
- Select your microSD card. Make sure that the device and size correspond to your microSD card.
- Start the flashing process. This may take several minutes. Do not remove the card until the flashing process is complete.
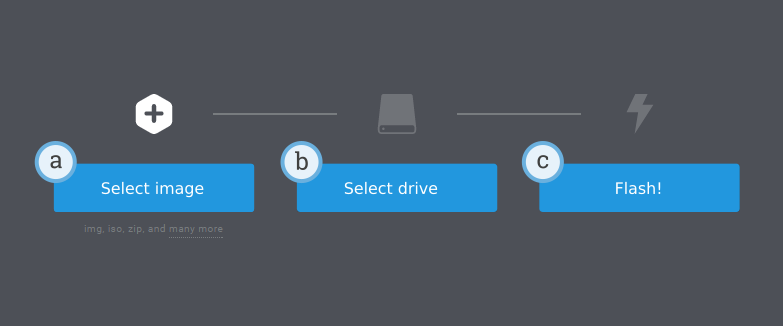
Figure 3 Using Etcher to flash the EV3 MicroPython microSD card image
Updating the microSD card
To update the microSD card, download a new image file using the link above and flash it to the microSD card as described above. Be sure to back up any MicroPython programs you want to save.
You do not need to erase the contents of the microSD card first. This is done automatically when you flash the new image file.
Using the EV3 Brick
Make sure the EV3 Brick is turned off. Insert the microSD card you prepared into the microSD card slot on the EV3 Brick, as shown in Figure 4.
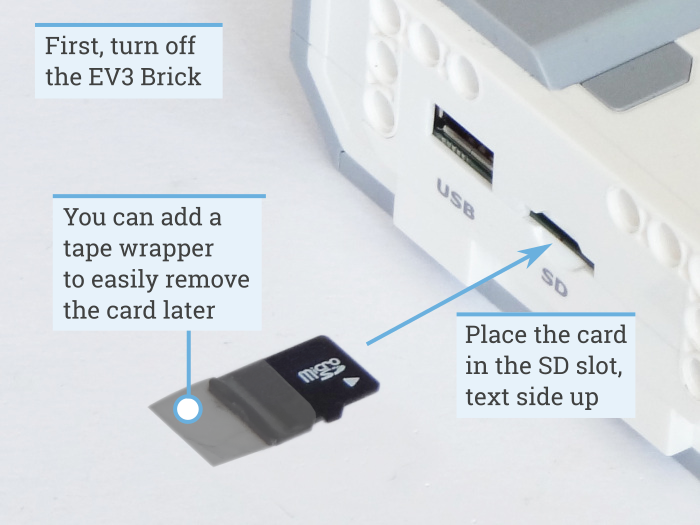
Figure 4 Inserting the flashed microSD card into the EV3 Brick
Turning the EV3 Brick on and off
Turn on the EV3 Brick by pressing the dark gray center button.
The boot process may take several minutes. While booting, the EV3 Brick status light turns orange and blinks intermittently, and you’ll see a lot of text on the EV3 screen. The EV3 Brick is ready for use when the status light turns green.
To turn the EV3 Brick off, open the shutdown menu with the back button, and then select Power Off using the center button, as shown in Figure 5.
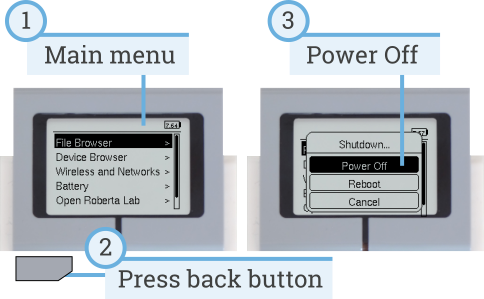
Figure 5 Turning the EV3 Brick off
Viewing motor and sensor values
When you’re not running a program, you can view motor and sensor values using the device browser, as shown in Figure 6.
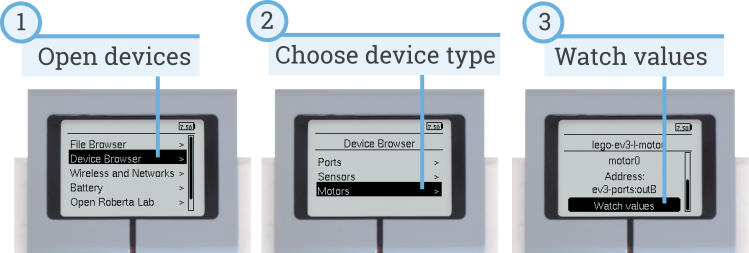
Figure 6 Viewing motor and sensor values
Running a program without a computer
You can run previously downloaded programs directly from the EV3 Brick.
To do so, find the program using the file browser on the EV3 screen and press the center button key to start the program as shown in Figure 7.
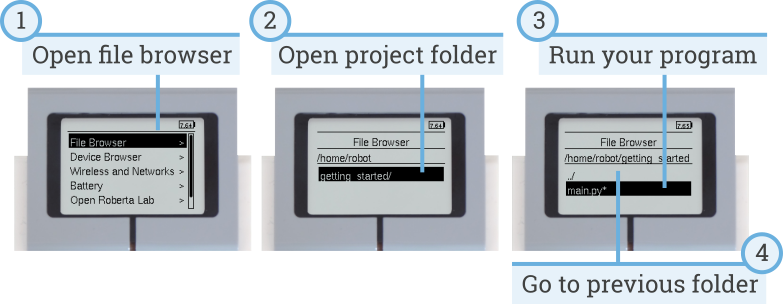
Figure 7 Starting a program using the buttons on the EV3 Brick
Going back to the original firmware
You can go back to the LEGO® firmware and your LEGO programs at any time. To do so:
- Turn the EV3 Brick off as shown above.
- Wait for the screen and brick status light to turn off.
- Remove the microSD card.
- Turn the EV3 on.
Creating and running programs
Now that you’ve set up your computer and EV3 Brick, you’re ready to start writing programs.
To make it easier to create and manage your programs, let’s first have a quick look at how MicroPython projects and programs for your EV3 robots are organized.
Programs are organized into project folders, as shown in Figure 8. A project folder is a directory on your computer that contains the main program (main.py) and other optional scripts or files. This project folder and all of its contents will be copied to the EV3 Brick, where the main program will be run.
This page shows you how to create such a project and how to transfer it to the EV3 Brick.
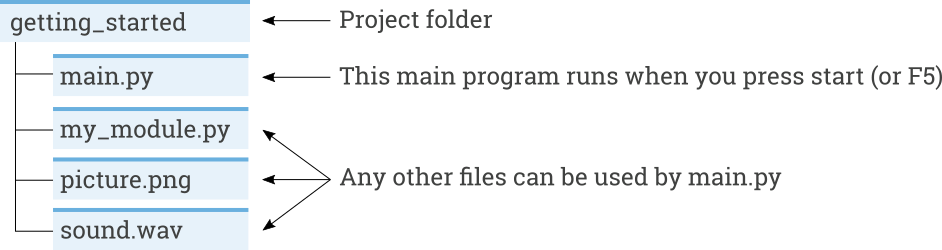
Figure 8 A project contains a program called main.py and optional resources like sounds or MicroPython modules.
Creating a new project
To create a new project, open the EV3 MicroPython tab and click create a new project, as shown in Figure 9. Enter a project name in the text field that appears and press Enter. When prompted, choose a location for this program and confirm by clicking choose folder.
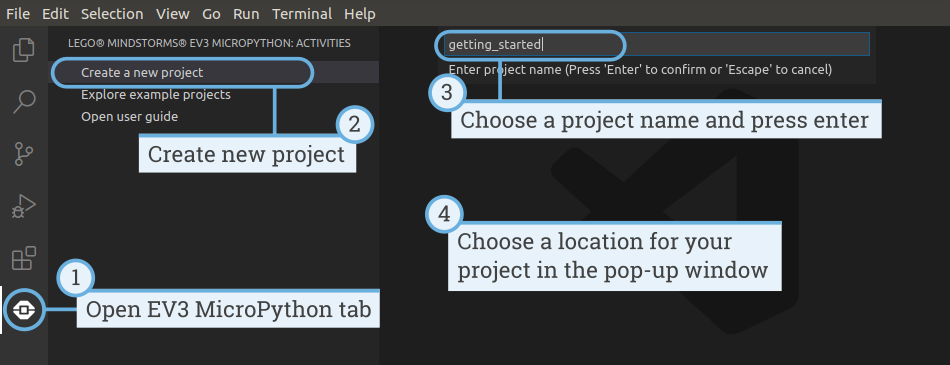
Figure 9 Creating a new project. This example is called getting_started, but you can choose any name.
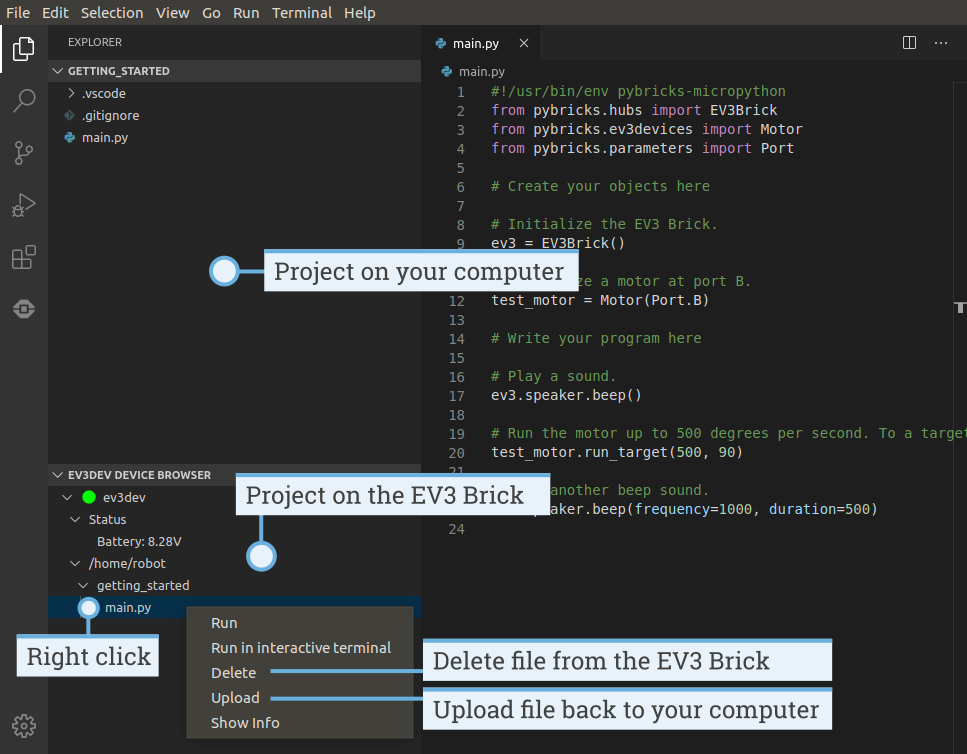
When you create a new project, it already includes a file called main.py. To see its contents and to modify it, open it from the file browser as shown in Figure 10. This is where you’ll write your programs.
If you are new to MicroPython programming, we recommend that you keep the existing code in place and add your code to it.
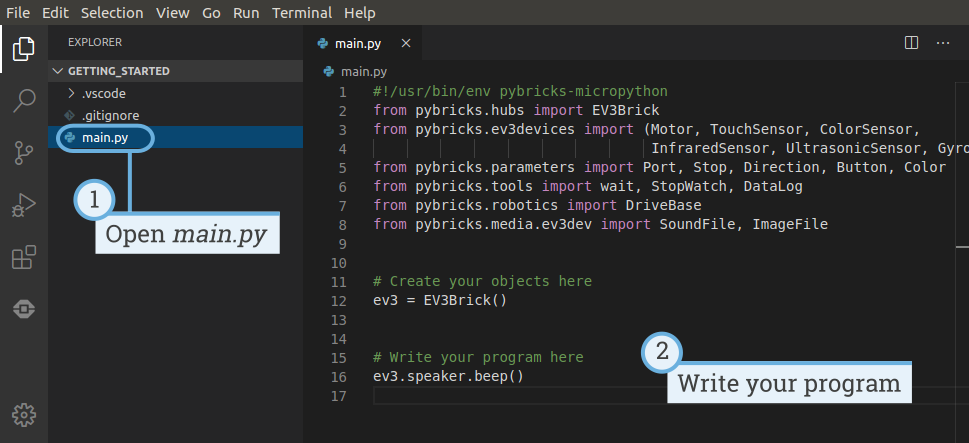
Figure 10 Opening the default main.py program.
Opening an existing project
To open a project you created previously, click File and click Open Folder, as shown in Figure 11. Next, navigate to your previously created project folder and click OK. You can also open your recently used projects using the Open Recent menu option.
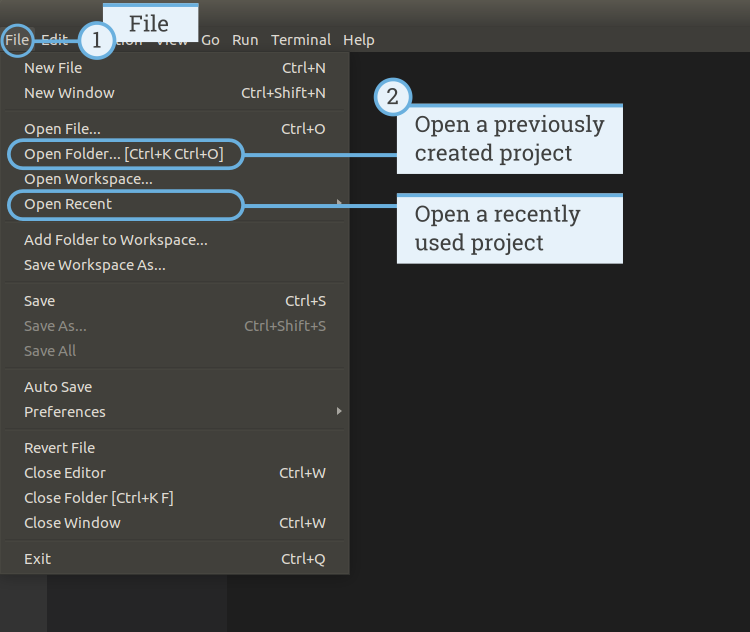
Figure 11 Opening a previously created project.
Connecting to the EV3 Brick with Visual Studio Code
To be able to transfer your code to the EV3 Brick, you’ll first need to connect the EV3 Brick to your computer with the mini-USB cable and configure the connection with Visual Studio Code. To do so:
- Turn the EV3 Brick on
- Connect the EV3 Brick to your computer with the mini-USB cable
- Configure the USB connection as shown in Figure 12.
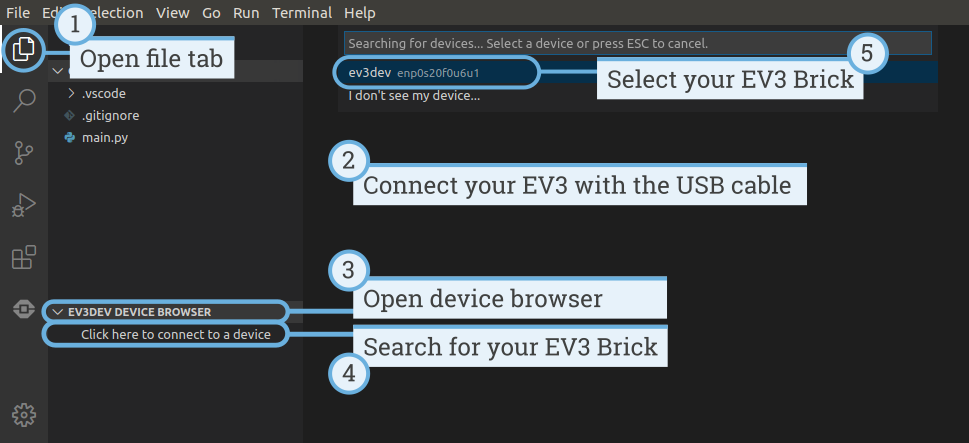
Figure 12 Configuring the USB connection between the computer and the EV3 Brick
Downloading and running a program
You can press the F5 key to run the program. Alternatively, you can start it manually by going to the debug tab and clicking the green start arrow, as shown in Figure 13.
When the program starts, a pop-up toolbar allows you to stop the program if necessary. You can also stop the program at any time using the back button on the EV3 Brick.
If your program produces any output with the print command, this is shown
in the output window.
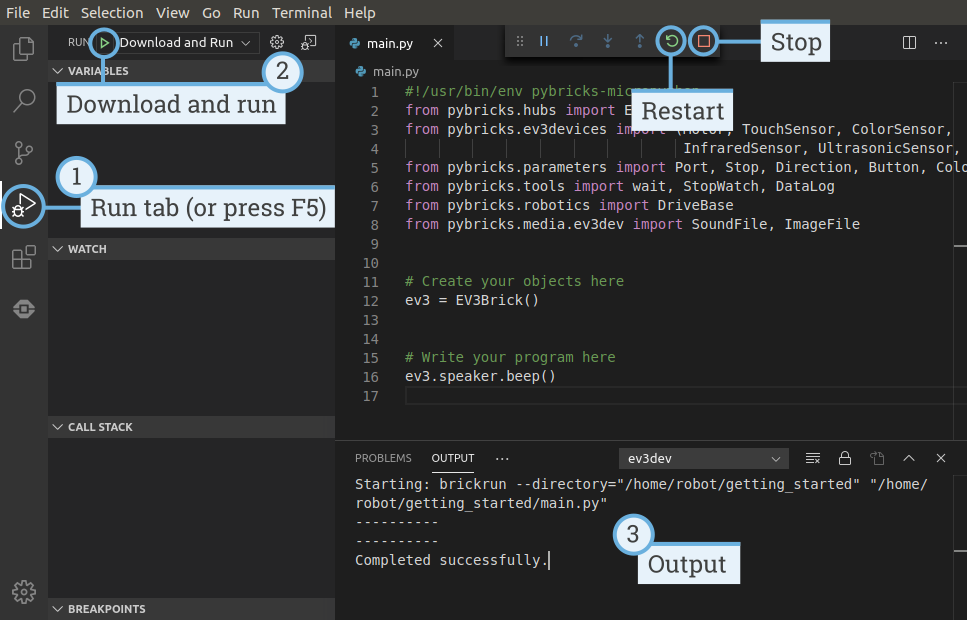
Figure 13 Running a program
Expanding the example program
Now that you’ve run the basic code template, you can expand the program to make a motor move. First, attach a Large Motor to Port B on the EV3 Brick, as shown in Figure 14.
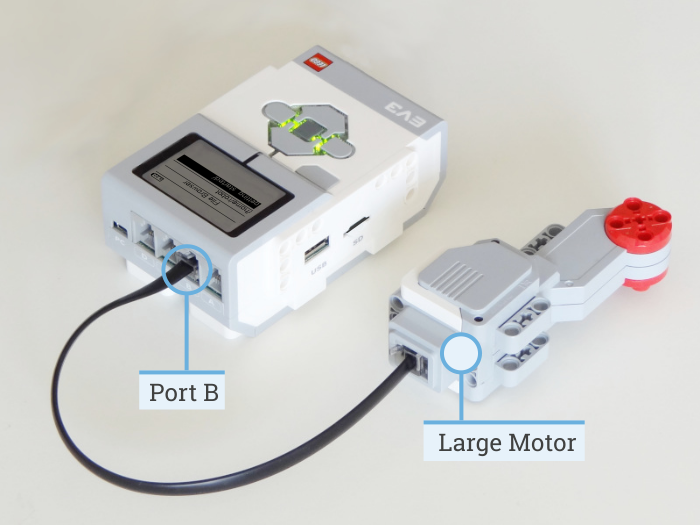
Figure 14 The EV3 Brick with a Large Motor attached to port B.
Next, edit main.py to make it look like this:
#!/usr/bin/env pybricks-micropython
from pybricks.hubs import EV3Brick
from pybricks.ev3devices import Motor
from pybricks.parameters import Port

# Create your objects here

# Initialize the EV3 Brick.
ev3 = EV3Brick()

# Initialize a motor at port B.
test_motor = Motor(Port.B)

# Write your program here

# Play a sound.
ev3.speaker.beep()

# Run the motor up to 500 degrees per second. To a target angle of 90 degrees.
test_motor.run_target(500, 90)

# Play another beep sound.
ev3.speaker.beep(frequency=1000, duration=500)
This program makes your robot beep, rotate the motor, and beep again with a higher pitched tone. Run the program to make sure that it works as expected.
Accessing advanced EV3 features
MicroPython runs on top of ev3dev, which is a specific version of Linux. Linux is an operating system. (Other popular operating systems are Microsoft Windows and Apple macOS.) This means that your EV3 is almost like a real computer, just much smaller.
Note
If you just want to write MicroPython programs, you can skip the remaining sections.
The remaining sections are aimed at curious users who want go beyond MicroPython and access some of the other built-in features of Linux and ev3dev.
The Linux command line
Although your EV3 Brick is quite like a real computer, you do not interact with it using a big screen and a mouse. Instead, you can access files and programs on it using the command line. It is also called the terminal.
Follow the steps in Figure 16 to access the command line. Now you can enter commands by typing them in and pressing enter.
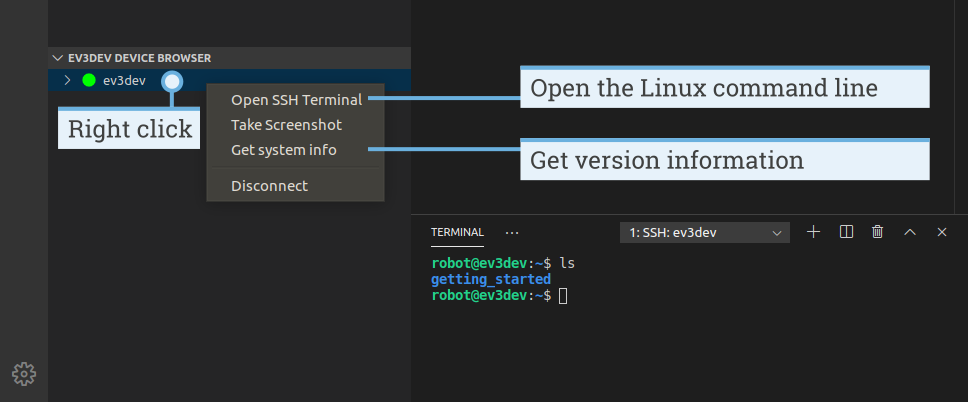
Figure 16 Opening the Linux command line and running the ls command.
Running basic commands
For example, if you type the following command and press enter:
ls
then you will see the contents of the current folder. Figure 16
shows the result: it listed the project folder of the getting_started
project that we just ran.
If you type the following command and press enter:
exit
then the command line will be closed. Alternatively, click the garbage icon shown in Figure 16.
You can copy text from the command line by selecting it and
then pressing ctrl shift c.
You can paste text into the command line
using ctrl shift v.
Running commands as an administrator
Some commands require a password to run. This is similar to administrative
tasks on your computer or tablet, such as installing a new app. These commands
work like any other command, but you add sudo in front of
them.
As an exercise, you can run the following command to turn the EV3 Brick off:
sudo poweroff
You will be prompted for a password. Type maker and then press Enter.
Warning
Only run commands with sudo if you know what you are doing.
Learning more about the command line
To learn more about the command line and many of the available commands, we recommend reading the beginner-friendly free ebook called The Linux Command Line.
To learn more about ev3dev-specific tips and tricks, visit the ev3dev website.
Changing the EV3 Brick name
When you search for your EV3 using Visual Studio Code, you see all EV3 Bricks listed by their name. By default, all EV3 Bricks are named ev3dev. Follow these steps to change that name:
Open Visual Studio Code and connect to your EV3 as usual.
Read the steps above about running commands as an administrator.
Think of a good name. In this example, we’ll call it
autonomous-vehicle2Enter the following command and press enter:
sudo hostnamectl set-hostname autonomous-vehicle2Reboot the EV3 Brick for the change to take effect.
You may need to reboot your computer as well.
EV3 Brick names should only contain lowercase letters a through z,
the digits 0 through 9, and the hyphen -. It must start with a
letter or digit. It cannot include spaces or other symbols.
Upgrading from v1.0 to v2.0
EV3 MicroPython version 2.0 was released on May 18, 2020.
This section is for users who have previously used LEGO MINDSTORMS EV3 MicroPython v1.0. We’ll explain what’s changed and how you can upgrade to benefit from the latest improvements.
If you are a new user and you just got started using version 2.0, you may skip this section.
Upgrading the microSD Card
To upgrade, download the latest microSD card file and install it using the standard instructions.
Note that this will erase all your existing files on the SD Card. Before you upgrade, make sure that you still have all your projects on your computer. If not, you can upload files back to your computer using these instructions.
As with any software update, be careful about when you update. For example, if you developed your code using version v1.0 and you are halfway into your robotics competition season, you may want to stick with v1.0 for now.
Upgrading your existing programs
Most changes in v2.0 are new features, like support for additional sensors. Naturally, this will not affect your existing code. However, some changes were made to existing features to improve performance.
All originally documented features in v1.0 will still work after you upgrade. This means that most programs originally made for v1.0 will work with the v2.0 microSD card image without any changes.
To try this, simply download and run your original code as you did before.
However, it is recommended that you upgrade both the microSD card and your programs at the same time to ensure everything works as expected.
The new EV3Brick() class replaces the ev3brick module
Version 2.0 introduces the EV3Brick() class.
You can use it instead of the old ev3brick module. The old ev3brick
module can still be used, but it is no longer recommended or documented.
The EV3Brick() class improves the speed and
reliability of the EV3 screen and the EV3 speaker. It also adds functionality
like speech and drawing shapes. The default
font size is also bigger to make it easier to read text on the screen.
You can use
the following table as a starting point to upgrade your scripts. See the
EV3Brick() class documentation for
complete details of all methods and arguments.
| Action | v1.0 | v2.0 |
Initialize
your EV3
|
from pybricks import ev3brick as brick
|
from pybricks.hubs import EV3Brick

ev3 = EV3Brick()
|
Light on
|
brick.light(Color.RED)
|
ev3.light.on(Color.RED)
|
Light off
|
brick.light(None)
|
ev3.light.off()
|
Read
Buttons
|
if Button.LEFT in brick.buttons():
    print("Left is pressed.")
|
if Button.LEFT in ev3.buttons.pressed():
    print("Left is pressed.")
|
Play a
beep
|
brick.sound.beep()
|
ev3.speaker.beep()
|
Play a
sound file
|
brick.sound.file(SoundFile.HELLO)
|
ev3.speaker.play_file(SoundFile.HELLO)
|
Text to
speech
|
ev3.speaker.say("I can say anything!")
|
|
Play
notes
|
ev3.speaker.play_notes(['C4/4', 'G4/4'])
|
|
Write text
at a given
position
|
brick.display.text("Hello!", (50, 60))
|
ev3.screen.draw_text(50, 60, "Hello!")
|
Write text
and scroll
automatically
|
brick.display.text("Hello")
brick.display.text("world!")
|
ev3.screen.print("Hello")
ev3.screen.print("world!")
|
Change font
size
|
from pybricks.media.ev3dev import Font

big_font = Font(size=24)
ev3.screen.set_font(big_font)
|
|
Display an
image on
the screen
|
from pybricks.parameters import ImageFile

brick.display.image(ImageFile.QUESTION_MARK)
|
from pybricks.media.ev3dev import ImageFile

ev3.screen.load_image(ImageFile.Question_MARK)
|
Draw shapes
on the screen
|
ev3.screen.draw_line(30, 30, 30, 100)
ev3.screen.draw_box(50, 30, 90, 60)
ev3.screen.draw_circle(70, 90, 20, fill=True)
|
|
Read
battery
voltage
|
brick.battery.voltage()
|
ev3.battery.voltage()
|
Other internal changes to existing features
Most methods of the
Motor()class now haveStop.HOLDas the default instead ofStop.COAST. This improves accuracy in most applications. You can still selectStop.COASTif you like.The internal PID controllers for the motors are more accurate than before. If you give a motor command when it is already running, it smoothly adjusts the speed to the newly given command. This works even if you keep adjusting the speed in a fast loop.
Methods to configure motor settings have changed. You can change settings using the control attribute now. The old settings setters continue to exist in the implementation, but they are no longer documented.
So-called Python keyword arguments are now supported. Previously, you could only enter the argument values. For example:
my_motor.run_angle(500, 90, Stop.HOLD, False)
This is still possible. But you can now choose to omit optional arguments and specify others with keywords. This can make your code easier to read. For example:
my_motor.run_angle(500, 90, wait=False)
It is no longer necessary to import
pybricks.tools.print. Theprintfunction is now built-in. It works just like Python or MicroPython.Most parameters in the
parametersnow have a specific type and representation. For example, suppose you measure a color and print the result. If you doprint(Color.RED), you will see the parameter instead of a technical number.Sound and image files have moved to a dedicated media module. Importing them from the old location will continue to work in this release, to make sure existing scripts will still work.
Installing an older version of the Visual Studio Code extension
The Visual Studio Code extension and this documentation are updated automatically. You can still use your existing scripts with the updated extension. If you absolutely wish to keep the old version, look for the EV3 extension on the extension tab, click the gear icon, and click install another version.